# Manage Reusable Content
This page discusses the ways that you can manage reusable content within the builder. There are different row management options, such as delete, edit, or display rows, available to you and your application's end users. Throughout this page, we will discuss these options and how you can implement them.
{% hint style="info" %}
**Note:** To sync rows, visit the [Implement Synced Rows page](https://docs.beefree.io/beefree-sdk/~/changes/480/rows/reusable-content/sync/implement-synced-rows).
{% endhint %}
## **List limits**
There is no limit to the number of rows passed to the builder in each array of *custom rows*.
However, the builder UI will only display the first **30 items** (i.e., the first 30 rows in the array).
The rest of them will not show until the user performs a search that matches them. If the search matches over 30 items, the first 30 are displayed.
This filtering is applied to prevent performance degradation in the browser.
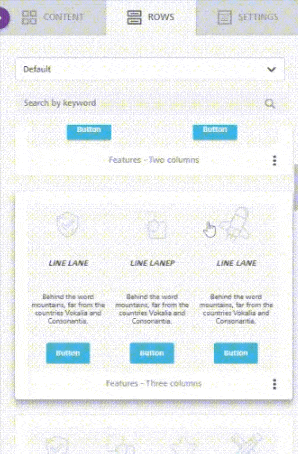
## **Search**
The search field allows users to narrow down the content shown after they select a list of [custom rows](https://docs.beefree.io/beefree-sdk/~/changes/480/rows/reusable-content/create/pre-build/implement-custom-rows).
The search is performed against all elements of the array (i.e., both visible and hidden), and the first 30 items (i.e., the first 30 rows in the array that match the search criteria) are shown.
All textual content included in the selected array – including image file names – is used to find a match.
## **Display order**
The order of the JSON nodes in `rowsConfiguration` defines the order in which the lists of custom rows will display in the drop-down. It also determines which list of rows will be used as default (selected) when the user clicks on the Rows tab for the first time during the session.
```javascript
rowsConfiguration: {
emptyRows: true,
defaultRows: true,
externalContentURLs: [{
name: "Acquisition series",
value: "https://URL-01"
},{
name: "Newsletter",
value: "https://URL-02"
},{
name: "Transactional",
value: "https://URL-03"
},{
name: "Post-Purchase Drip",
value: "https://URL-04"
}]
},
```
### **Row type order**
The first ordering factor refers to the **type of row** (empty, default, custom). That’s defined by how the following parameters are listed in *rowsConfiguration*:
* *emptyRows*
* *defaultRows*
* *externalContentURLs*
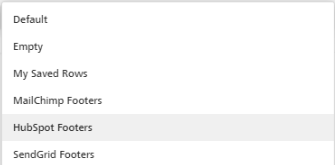
You would list `defaultRows` before `emptyRows`to obtain the order shown in the following screenshot:
### **External content order**
The order inside the `externalContentURLs` node defines the order of the **Custom rows**.
In the above example configuration:
1. `emptyRows` will be the first item in the drop-down and the default selection when clicking on the Rows tab.
2. `defaultRows` will be the second item in the drop-down.
3. The lists of rows defined in `externalContentURLs` will follow their ordering in the drop-down.
It’s up to you – the host application – to decide what’s available and in which order.
### **Row type requirements**
Note the following row type requirements when configuring your rowsConfiguration parameter:
* `emptyRows` and `defaultRows` are **not** required.
* This allows you to load just **Custom rows** through `externalContentURLs`, if needed, controlling which rows end users can drag and drop into the builder.
## Setting a Category's Maximum Rows
The `maxRowsDisplayed` parameter enables you to define the number of rows displayed under each user-created category in the application's sidebar, without affecting the "Empty" and "Default" categories. It directly influences the number of saved rows an end user sees when they click on a category in the sidebar.
You can set the `maxRowsDisplayed` parameter in the `rowsConfiguration` object in the Beefree SDK Configuration as follows:
```json
rowsConfiguration: {
maxRowsDisplayed: 50
}
```
## Saved Row Management Actions
The following section discusses how to configure the Saved Rows Management categories.
Accessing, and organizing saved rows is intuitive with Saved Rows Management. With this feature, there is an available action in the list of saved rows that your application can intercept to handle changes in this list itself. This means you can delete, rename, or re-organize your saved rows inside the builder.
### How to implement
Implementing Saved Rows Management Actions requires some development effort from the host application. This section outlines what you need to know for each action.
#### **Configure Delete Rows**
To get started, you will need to create a content dialog in your application configuration parameters. The content dialog method should be named `onDeleteRow` and be nested under the `contentDialog` object, as follows:
```javascript
beeConfig: {
container: 'bee-plugin-container', // [mandatory]
contentDialog: {
onDeleteRow: {
handler: async (resolve, reject, args) => {
}
}
},
}
```
Following that, amend your `rowsConfiguration` object with the additional parameters:
* The `handle` parameter to utilize in your `onDeleteRow` handler from the previous step
* The optional `behaviors` parameter to set management permissions
Here’s an example:
```javascript
rowsConfiguration: {
externalContentURLs: [
{
name: "Saved Rows",
value: "category-value",
handle: "category-handle",
behaviors: {
canEdit: true,
canDelete: false,
canEditSyncedRows: false,
canDeleteSyncedRows: false,
},
}
],
maxRowsDisplayed: 50
}
```
When the `onDeleteRow` method is called, utilize the 3rd parameter to obtain an argument containing the handle value of the row being requested, as well as the row metadata. Use the handle and the row’s metadata to determine which row should be deleted.
#### **Example** **args:**
```json
{
value: "category-value",
handle: "category-handle",
row: {
name: "My row name",
metadata: {
name: "My row name",
guid: "key-for-deletion"
}
... // more row data
}
}
```
Finally, we can call the `resolve` method, passing the value `true` if you want to refresh the rows, or `false` if you want to keep the side panel’s current listing.
#### **Example onDeleteRow with args:**
```javascript
beeConfig: {
container: 'bee-plugin-container', // [mandatory]
contentDialog: {
onDeleteRow: {
handler: async (resolve, reject, args) => {
// get the unique row id from metadata
const row_id = args?.row?.metadata?.guid
// pseudo code to delete a row and refresh the panel...
const result = await fakeRowDeleteService(row_id)
if (result === 'success') resolve(true)
reject(result)
}
}
},
}
```
#### **Configure Edit Row Metadata**
To get started, much like with deleting rows, you will need to create a content dialog in your application configuration parameters. The content dialog method should be named `onEditRow` and be nested under the `contentDialog` object, as follows:
```javascript
beeConfig: {
container: 'bee-plugin-container', // [mandatory]
contentDialog: {
onEditRow: {
handler: async (resolve, reject, args) => {
}
}
},
}
```
Following that, amend your `rowsConfiguration` object with the additional parameters:
* The `handle` parameter to utilize in your `onEditRow` handler from the previous step
* The optional `behaviors` parameter to set management permissions
Here’s an example:
```javascript
rowsConfiguration: {
externalContentURLs: [
{
name: "Saved Rows",
value: "category-value",
handle: "category-handle",
behaviors: {
canEdit: true,
canDelete: false,
canEditSyncedRows: false,
canDeleteSyncedRows: false,
},
}
]
}
```
When the `onEditRow` method is called, utilize the 3rd parameter to obtain an argument containing the handle value of the row being requested, as well as the row metadata. Use the handle and the row’s metadata to determine which row should be edited.
#### **Example** **args:**
```javascript
{
value: "category-value",
handle: "category-handle",
row: {
name: "My row name",
metadata: {
name: "My row name",
guid: "key-for-deletion"
}
... // more row data
}
}
```
Finally, we can call the `resolve` method, passing the value `true` if you want to refresh the rows, or `false` if you want to keep the side panel’s current listing.
#### **Example onEditRow with args:**
```javascript
beeConfig: {
container: 'bee-plugin-container', // [mandatory]
contentDialog: {
onEditRow: {
handler: async (resolve, reject, args) => {
// get the unique row id from metadata
const row_id = args?.row?.metadata?.guid
// pseudo code to edit a row and refresh the panel...
const result = await openFakeDialogToEditRow(row_id)
if (result === 'success') resolve(true)
reject(result)
}
}
},
}
```
### **Errors and Warnings**
Saved Rows Management also provides errors and warnings for your application, so you can handle all cases gracefully.
#### **Sample warning:**
```json
{
warn: {
message: "This is a warning",
detail: "You don't have management permissions."
}
}
```
#### **Sample error:**
```json
{
error: {
message: "This is an error",
detail: "You don't have management permissions."
}
}
```
You can call the `reject` method, passing the message you want to display.
#### **Example:**
```javascript
beeConfig: {
container: 'bee-plugin-container', // [mandatory]
contentDialog: {
onEditRow: {
handler: async (resolve, reject, args) => {
const warn = {
message: 'This is a warning.',
detail: 'You don't have management permissions.'
}
return reject({ warn })
}
}
},
}
```